

Installation Guidelines
Most of our wall panels are equipped with a self-adhesive backing. This makes them versatile and quick to use. WallFace wall panels adhere immediately, require no drying time and are easy to process. The surface should be clean, dry, free of dust and dirt. For very absorbent surfaces (e.g. masonry), an adhesive primer or wallpaper primer may be recommended as a primer.

The WallFace decorative panels must be acclimatized, i.e. brought to room temperature before processing. This serves to avoid the formation of condensation on the adhesive surface and to reduce panel expansion through reduced temperature differences.
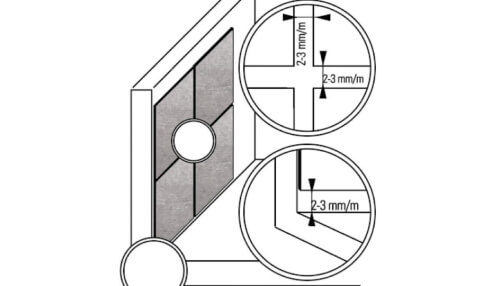
The majority of our WallFace products are made of thermoplastics, which expand by approx. 0.7 mm over a length of 1 m when the temperature increases by 10 °C. Therefore, an expansion joint of approx. 2-3 mm must be taken into account at the edges of the panel. If the ambient temperature is high or the temperatures fluctuate significantly, the expansion joint should be enlarged or the panel format should be smaller.
To avoid expansion joints, you can use wall panels from the Antigrav or Nature collections.
The surface must be free of loose parts, dry, smooth, free of dust, dirt, grease, wax and silicone. Depending on whether the surface is absorbent or non-absorbent, different bonding options are used.
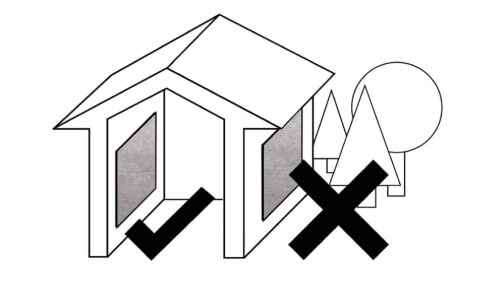
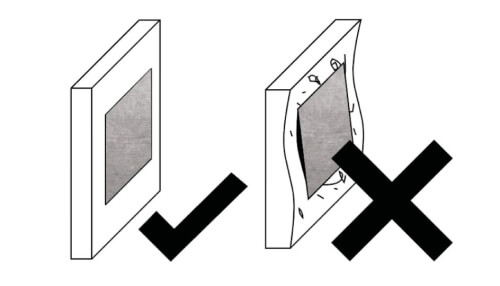
In the case of convex and concave surfaces, mechanical fastening in the edge area is absolutely necessary.
The surface must be free of loose parts, dry, smooth, free of dust, dirt, grease, wax and silicone. Never install WallFace panels on uneven surfaces, as this results in a loss of visual quality. In the case of convex and concave surfaces, mechanical fastening in the edge area is absolutely necessary (except for the M-Style Collection).
Non-absorbent surface:
To achieve maximum adhesion, always clean non-absorbent surfaces with alcohol (ethanol, isopropyl alcohol). Self-adhesive panels are best suited for non-absorbent surfaces such as coated MDF/chipboard, glass, metal, plastic, etc.
Absorbent surface:
For absorbent surfaces such as raw chipboard, MDF, plasterboard or smoothed masonry, a solvent-free adhesive must be used, which is suitable for both the surface and the polystyrene material (support material). Our recommendation: silicone or MSPolymer hybrid adhesive.
The self-adhesive design panels from WallFace can be glued directly to the surface, taking into account an expansion joint – without additional glue. The surface should be clean, dry, free of dust and dirt. For very absorbent surfaces (e.g. masonry), an adhesive primer or wallpaper primer may be recommended as a primer.
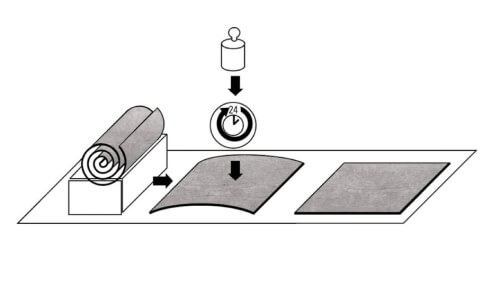
Use a carpet knife to cut the desired shape/length from the surface. Remove the adhesive cover step by step, without touching the adhesive surface, and press the panel as firmly as possible onto the surface using a medium-hard rubber/wallpaper roller. Avoid the formation of bubbles (air pockets). For large areas, it is best to use a medium-hard hand rubber roller with a width of approx. 170 mm. The final adhesive strength is achieved after 24 hours at room temperature. If possible, WallFace products should be processed within 18 months.
With self-adhesive products from the Nature Collection, the expansion joint can be omitted.
Antigrav panels can be glued end-to-end – thus leaving no expansion joints. Decorative panels from the Antigrav Collection can be cut using standard cutting tools be adjusted. The processing always takes place from the decorative surface. Easy to readjust by gluing with neutral, cross-linked silicone or MS polymer hybrid adhesive to all surfaces.
Since the products in the Capiz and Crystal collections have a non-woven backing layer, they are attached like non-woven wallpaper with a non-woven adhesive.
The surface should be clean, dry, free of dust and dirt. Please use an adhesive or wallpaper primer as a primer. Use a utility knife to cut the desired shape/length from the surface if necessary. Roll up the fleece adhesive directly onto the wall surface in a layer of approx. 3 mm. Then stick the wall covering together like a non-woven wallpaper, one strip at a time or tile by tile, and press it onto the wall with a medium-hard rubber or wallpaper roller without applying much force. Avoid the formation of air and bubbles.
Please handle the material carefully when unrolling and attaching and do not bend it to avoid folds and breaks on the fragile surface.
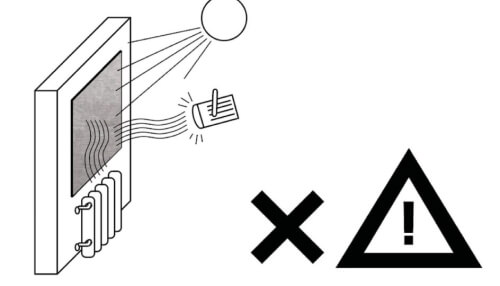
Do not use abrasive cleaners, solvent-based cleaners or pure alcohol!
Deco, Structure, Nature, M-Style, Wood, Opaco, S-Glass, Antigrav collections:
For light soiling, use a soft cleaning cloth (this must be free of dust and dirt). If it is heavily soiled, use a commercially available plastic or window cleaner (do not spray the cleaner onto the material, but rather sparingly onto the cleaning cloth).
Leather Collection: Clean leather surfaces using commercially available liquid soap and then remove the soap with a damp cloth.
Fabric Collection: Dirt caused by oils, grease and ink must be removed immediately. If the surface is lightly soiled, vacuum it; if it is heavily soiled, dab the stain with an absorbent cloth, then wipe with mild soapy water.
We recommend cleaning printed surfaces only with light soapy water and not using abrasive agents, glass cleaners or the like. Rinse with clean water. Cleaning/care may vary depending on the printing ink manufacturer.
In general, when transporting WallFace products, care must be taken to ensure that they are protected from dirt, UV radiation, moisture and mechanical damage.
Use stable, flat pallets with a cardboard base; the pallet should protrude from the panels. Place the top decorative panel on the pallet with the decorative side facing down. This top decorative panel should be additionally protected by a cardboard box and a board (e.g. chipboard, HDF, …). The panels must be secured against slipping.
The edges and sides must also be protected (edge protection, PE film, …) Temperatures below – 35 °C or above + 50 °C should not be exceeded. Do not transport structural panels on a pallet with a structural offset. Many of the WallFace panels can be transported rolled up.
WallFace wall panels must always be stored in indoor storage, no outdoor storage!
The following must be taken into account:
Store panels flat, unpack rolled panels and lay them flat. Weighting them down improves the flatness (please use a cardboard base and weigh it down over the entire surface to avoid damage). Store the top panel in the stack with the decor side down.
Store WallFace products protected from UV radiation. Continuous storage of our materials below 0 °C or above +30 °C for a period of more than one month can impair the quality and is therefore not recommended.
S-Glass and Opaco collections:
Wrap the plates in foil, add a silicate bag and tape it shut. This prevents possible waves forming in the edge area of the panels due to exposure to humidity.
All mechanical processing must always be carried out from the decorative surface. Please take into account the technical table of the selected product to ensure that the processing step is permitted for this product.
Cut
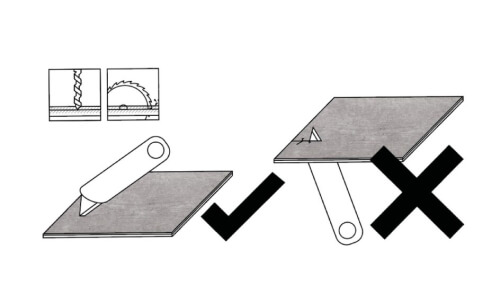
The majority of our decorative panels can be easily cut with a wallpaper knife. Simply score the surface (decor side) and break over the edge. For self-adhesive products, the adhesive or film must be cut through the edge on the back after it breaks. Please always use knives that cut well. For mechanical cutting, we recommend using paper or veneer cutting machines. Decorative panels from the S-Glass and Opaco collections can be cut with jigsaws, hand-held circular saws and format/table saws.
Punching
A strip steel cut is best suited for 1 to 1.5 mm thick design panels.
Drill
All WallFace wall panels can be drilled from the decor side.
Laser cutting
The majority of WallFace panels can be processed with commercially available lasers. The cutting speed depends on the wattage of the laser.
With colors specifically suitable for the respective application, it is possible to print some of our decorative panels using screen or digital printing processes. This is a valuable option, especially for the display area. Logos and other motifs can be attached to the panels and help create your brand’s image. Due to the many different printing and color systems, a printing test must be carried out by the customer. The printing result depends on the respective print motif. Original samples for tests will be made available. To do this, please contact our customer service.
You can find out whether and for which process WallFace wall panels and decorative panels are suitable for the respective product.
Maintaining a healthy environment is a high priority for us! We check all the raw materials we use for their environmental compatibility. Since not everyone has their own plastic disposal container, it is important to us when developing our new designs to only select high-quality materials: materials that can also be safely disposed of with household waste. We have current LGA certificates for all WallFace panels. We are happy to provide these.
WallFace products must not be exposed to water or moisture. Protect materials from dirt, dust and mechanical damage.
This information was created to the best of our knowledge and with particular care. The information is based on practical experience, test results as well as our own experiments and the current state of knowledge. No liability can be assumed for errors!
WallFace Wall Panel Installation Guidelines
Download our Installation Guidelines as a PDF document here.